Sign in
  Account

Master your iPhone with these 10 must-have settings.
Master your iPhone with these 10 must-have settings.
Are you a newbie to the iPhone? Don’t know how to set up and what are the essential settings?
Don’t worry! We are here to make your iPhone experience seamless and exceptional!
iPhone settings can provide a ton of features like iCloud - a digital sanctuary to store your photos, videos, data & files, etc. Adjust your display and brightness settings as per your requirements, Setup a Passcode and Face ID and protect it from someone accessing your iPhone data without your permission, and functionalities that can improve your experience.
And as a noob, getting to know these must-have settings to set up in your new iPhone can save you from a ton of headaches in the long run. Explore to know the steps on how you can set these settings in your new iPhone.
iCloud: Your Digital Sanctuary
Looking for something in your iPhone that can help you store your data, files, photos, etc? Well, don’t worry, Apple’s iCloud can be your savior!!
iCloud - Apple's Cloud storage service that enhances your iPhone experience. You can store and access your data, which includes music, photos, videos, documents, and more, from all your Apple devices. With iCloud, you can also keep your data secure and back up your data in case you lose or damage your device. You can access your data from another Apple device with the same Apple ID.
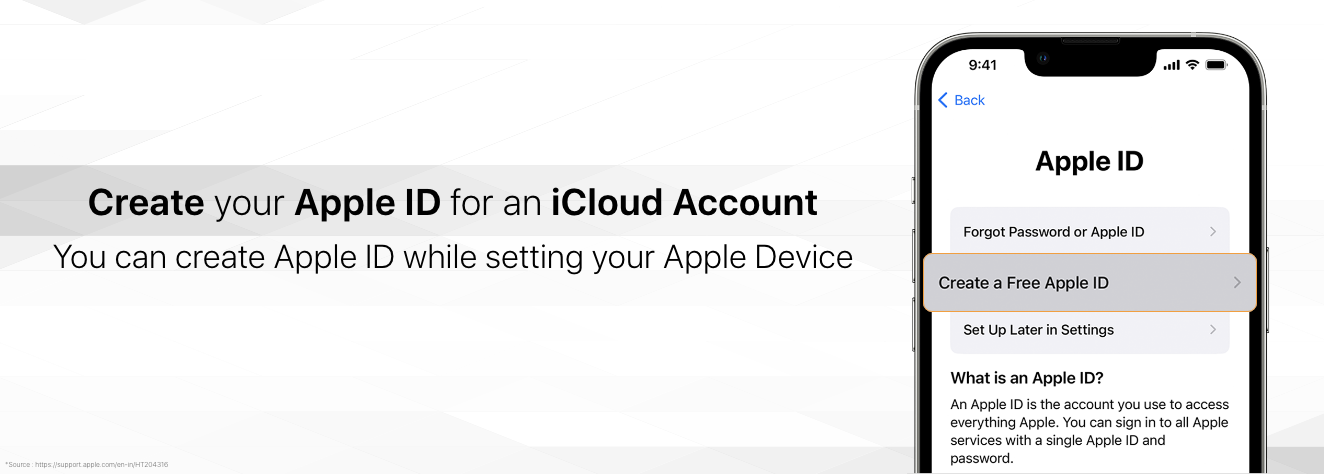
How to create an Apple ID while setting up your Apple Device
- When you first set up your device, you'll be asked to create an Apple ID.
- If you don't have one or forgot your password, tap the option that says "Forgot password or don't have an Apple ID?"
- Then, select the option to "Create a Free Apple ID."
- Tap "Next" after entering your birthdate and name.
- A free iCloud email address can be obtained, or you can even use your existing email address.
- Set up two-factor authentication, verify your email, create a strong password, and select your device's region by following the onscreen instructions.
Display & Brightness: Your Screen, Your Rules!
Want to enhance your iPhone experience?
Understanding Display and Brightness settings is key to enhancing your iPhone experience.
Here are some important display & brightness settings and how to configure them:
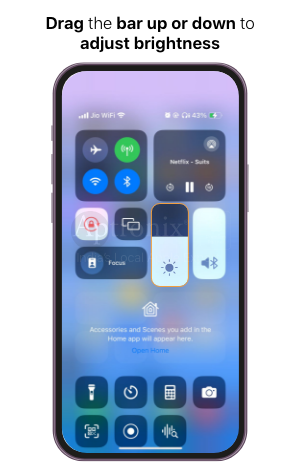
- Adjusting Brightness:
- You have control over the brightness of your iPhone screen. To adjust it, swipe down from the upper right corner of the screen to open the Control Center. Then, drag the brightness slider up or down to your desired level. Also, you can go to "Settings" > "Display & Brightness" and use the slider there to customize brightness.
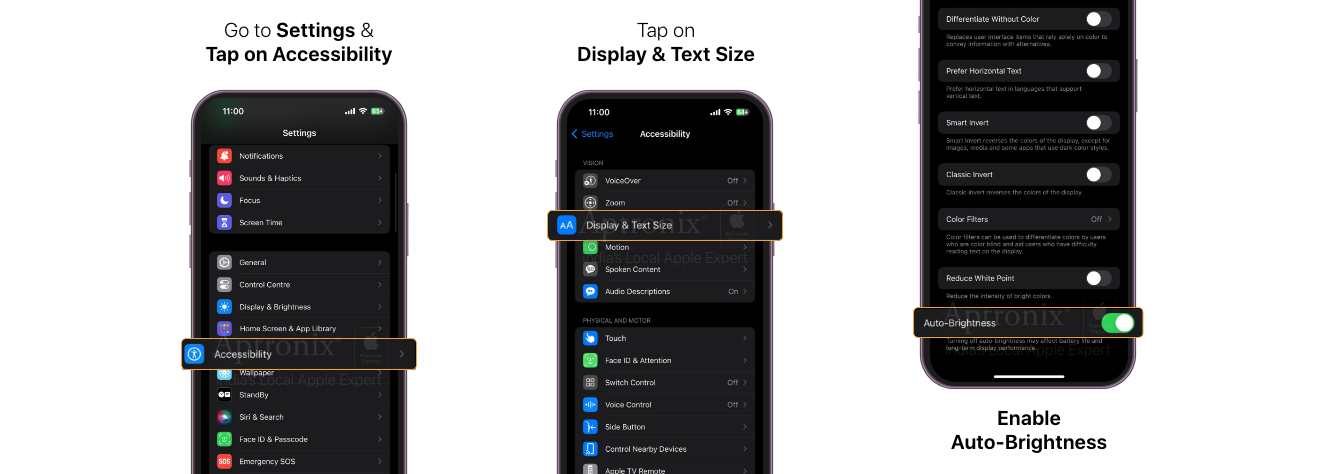
Auto-Brightness:
- For a more adaptive brightness experience, you can enable auto-brightness. This feature allows your iPhone to automatically adjust the screen brightness according to your surrounding ambient light conditions.
- To activate auto-brightness, navigate to "Settings" > "Accessibility" > "Display & Text Size," and toggle on the Auto-Brightness option.
Dark Mode or Light Mode:
- Dark mode is a useful option that reduces eye strain and conserves battery life by changing the display's color scheme to darker tones. To enable dark mode, head to "Settings" > "Display & Brightness," and select the Dark option.
- Light Mode is a default set up but if you want to change from dark mode to light mode again, all you need to do is again go to Display & Brightness and now select the Light mode.
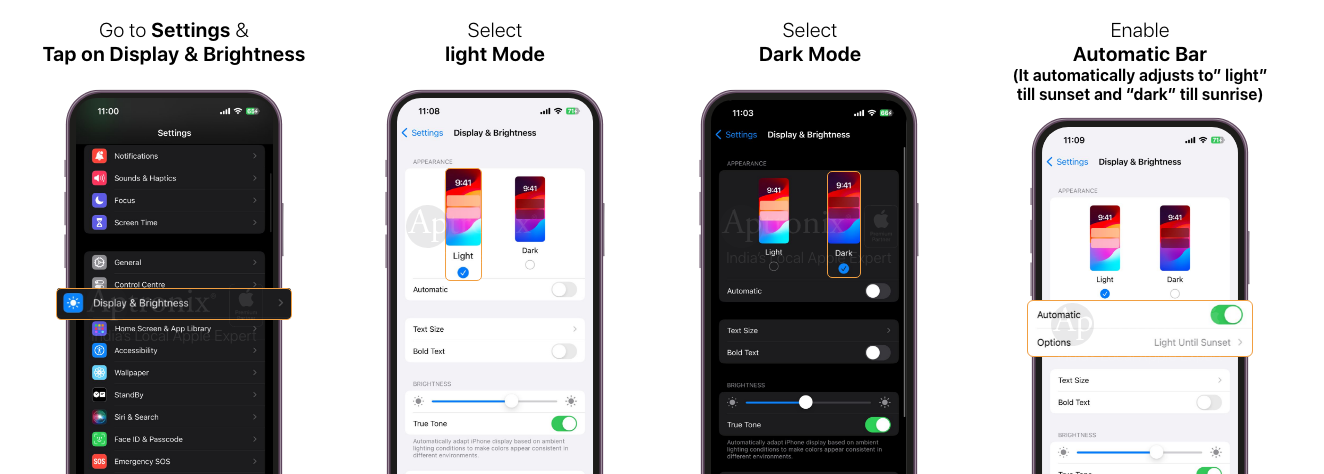
True Tone:
- True Tone is another feature that optimizes your display's color and intensity to match the surrounding environment, resulting in more natural-looking images. To turn on True Tone, go to "Settings" > "Display & Brightness," and enable the True Tone option.
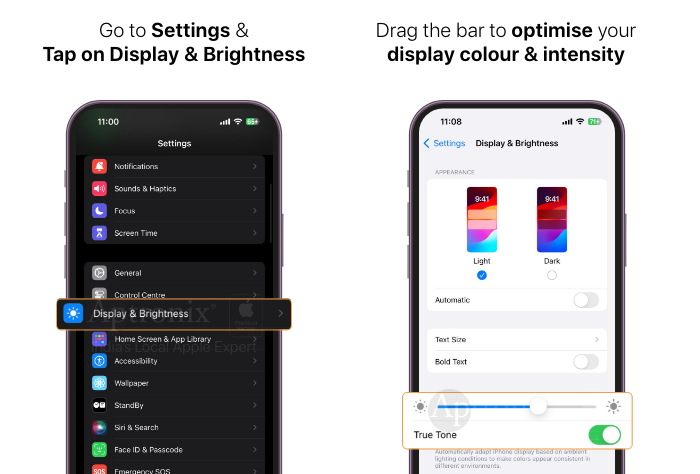
By adjusting brightness, activating auto-brightness, utilizing dark mode, and enabling True Tone, you can tailor your iPhone's display to your liking, reducing eye strain and enhancing your overall user experience.
Face ID & Passcode
Is someone accessing your iPhone data without your permission? Do you feel annoyed?
Here is another must-have setting that you need on your iPhone: "setting -up a passcode," a secure way to protect your data from others accessing it without your permission!
You can even add a FaceID to unlock your iPhone, which helps you unlock your iPhone in public without fear of people knowing or tracking your passcode.
Do you want to know how to set up? Here is how you can do it: follow these simple steps to set up Face ID & Passcode.
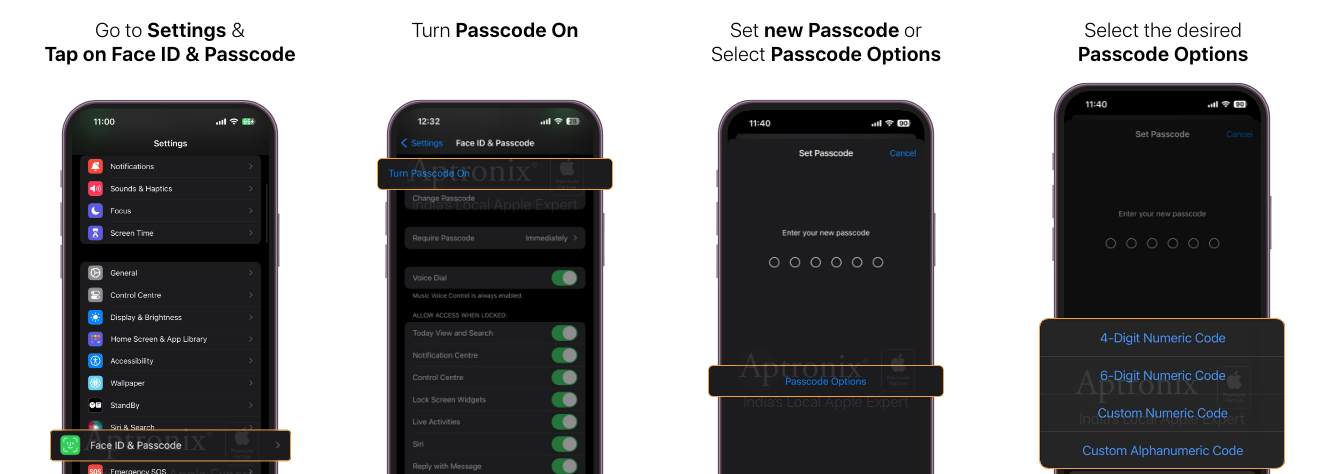
- Open the Settings app on your iPhone.
- Tap on Face ID & Passcode or Touch ID & Passcode, depending on your iPhone model.
- Tap "Turn Passcode On" and enter a six-digit passcode. Alternatively, you can tap "Passcode Options" to choose a four-digit numeric code, a custom numeric code, or a custom alphanumeric code.
- Enter the same passcode you entered before to confirm.
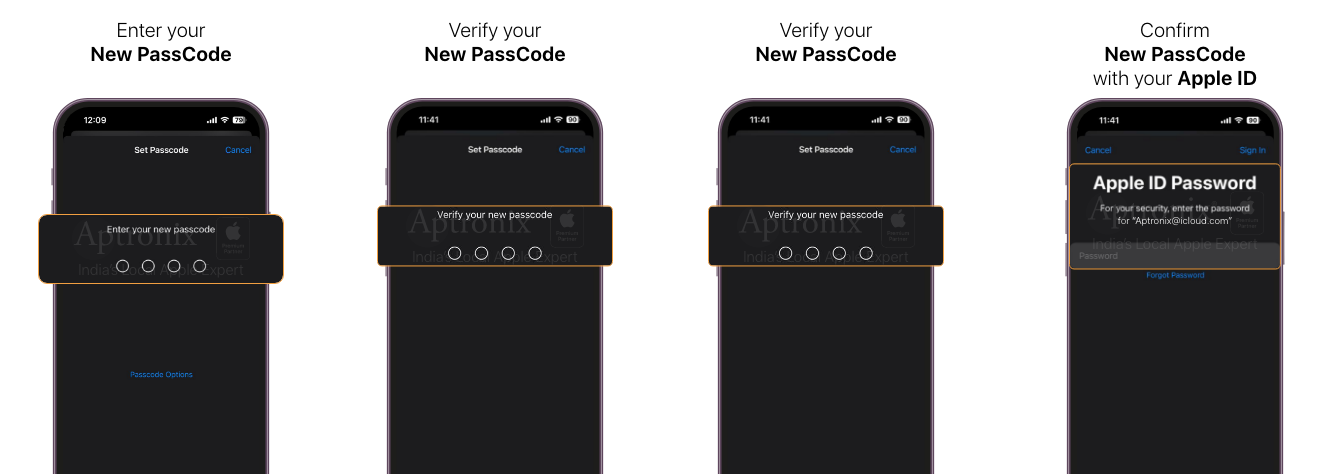
If you have an iPhone with a Face ID, you can also set up a Face ID to unlock your iPhone. To do this, go to Settings > Face ID & Passcode > Set up Face ID, then follow the onscreen instructions.
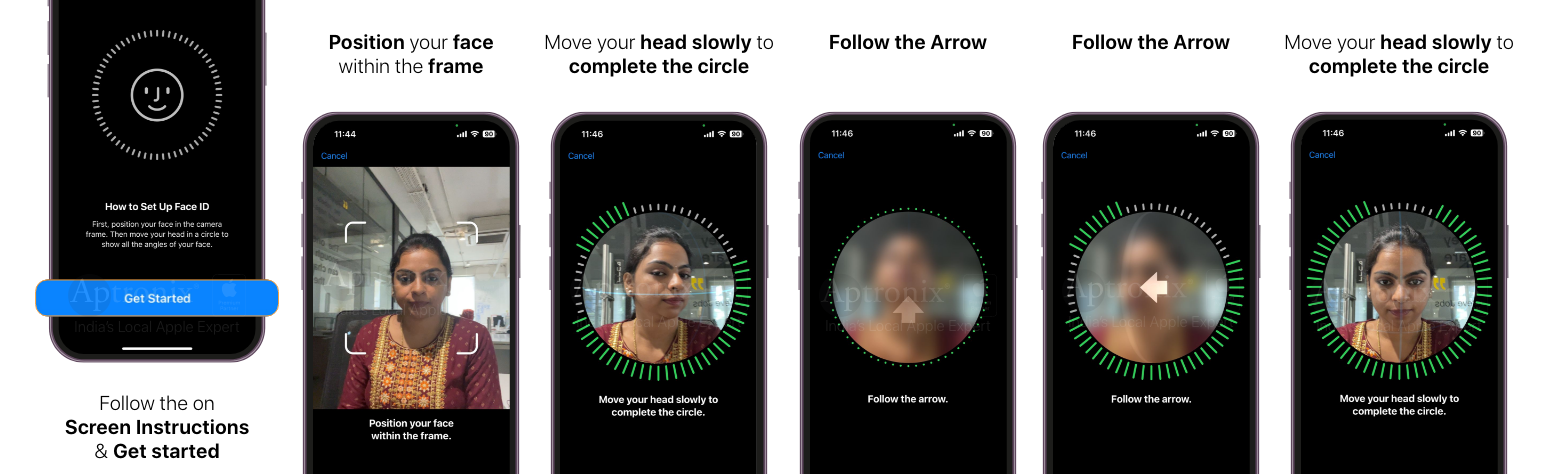
Voila! You can now unlock your iPhone by just scanning your face, and the best part is you can also set your face ID with a mask, making it easier for you to unlock your iPhone without taking off your mask.
Emergency SOS: A Digital Lifeline for Your Safety!
In life-threatening situations (medical emergencies or safety concerns), all we need is help and hope that reassures you that you are not alone. That's where the Emergency SOS feature- another must-have setting on iPhone steps in.
Emergency SOS is a digital lifeline that connects with your emergency contacts to send a signal asking for help and send your whereabouts to them.
Here is some information about how it works and what settings need to be enabled or how it works.
Follow these simple steps to set up Emergency SOS.
- Open the Settings app on your iPhone.
- Tap on Emergency SOS.
- Turn on the "Call with Side Button" option if it's not already enabled.
- Add emergency contacts by tapping on "Set up Emergency Contacts."
- Turn on "Auto Call" if you want your iPhone to automatically call emergency services when you press and hold the side button and volume button.
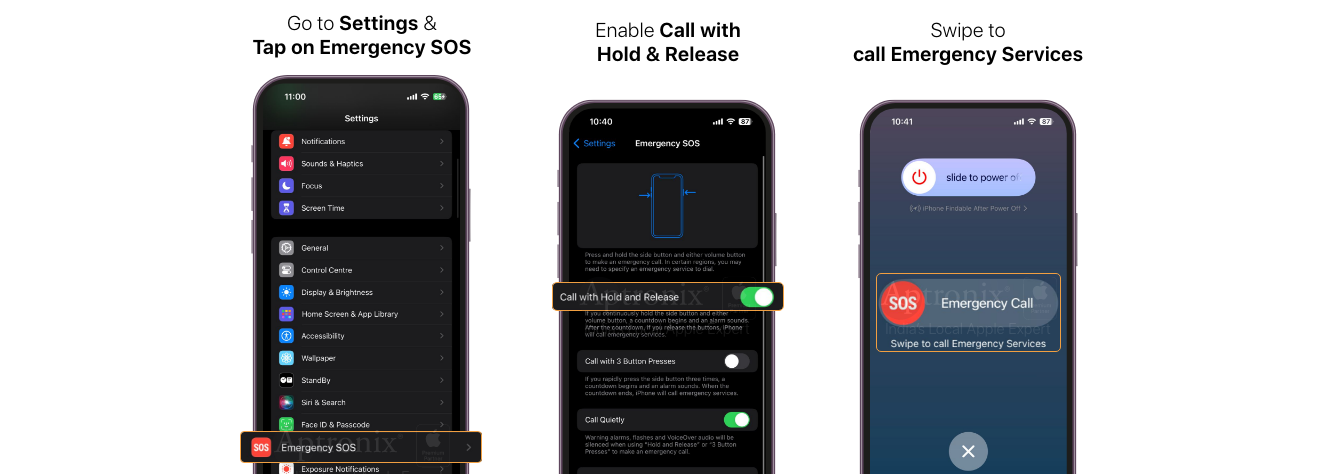
When you initiate an Emergency SOS call, your iPhone will automatically dial the local emergency number while simultaneously sharing your precise location details with the appropriate emergency services. Following the conclusion of the emergency call, your iPhone will notify your designated emergency contacts via text message unless you opt to cancel this alert.
Your iPhone will continually update your emergency contacts on your changing location for a period after you activate SOS mode. From iPhone 14, Emergency SOS can even be utilized to send text messages to emergency services via satellite when cellular and Wi-Fi signals are unavailable. It's essential to keep in mind that Emergency SOS functionality relies on either a cellular connection or Wi-Fi calling with an active internet connection from your iPhone. Satellite services are only restricted to the United States.
Privacy & Security: Keep the hackers at bay
Want to control what information you're sharing from your device and where? Privacy and security settings on iPhone allow you to protect your personal information from unauthorized access.
The must-have Privacy and Security settings in your iPhone that can save your data from hackers include two-factor authentication, Cross-site tracking, Account recovery, Keeping track of your passwords, and many more features that allow you to keep your data private and secure.
Here are a few important privacy and security settings that help you stay worry free!
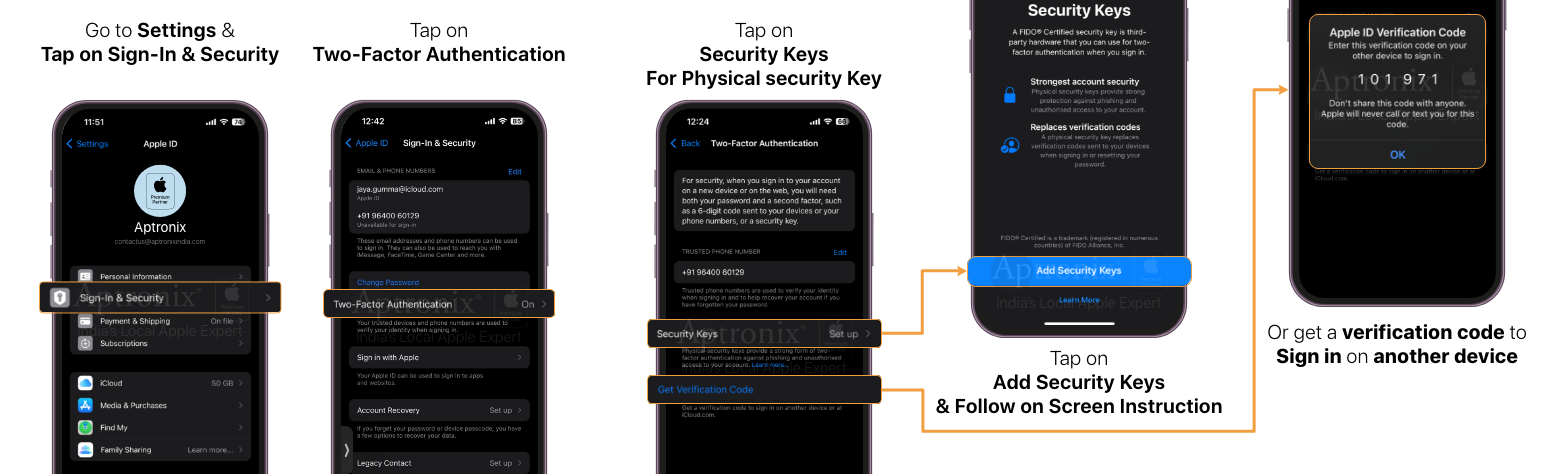
- Two-factor authentication: The two-factor Authentication provides an additional layer of security for your Apple ID. When you log in to your Apple ID, you need to enter a verification code in addition to your password.
Go to settings>click on your Apple Id name > Password & Security> click on Turn Two- Factor Authentication> Follow the on screen instructions.
- Cross-site tracking prevention: This function helps deter advertisers from monitoring your online activity across various websites by blocking third-party cookies. This is a default setup in any iPhone
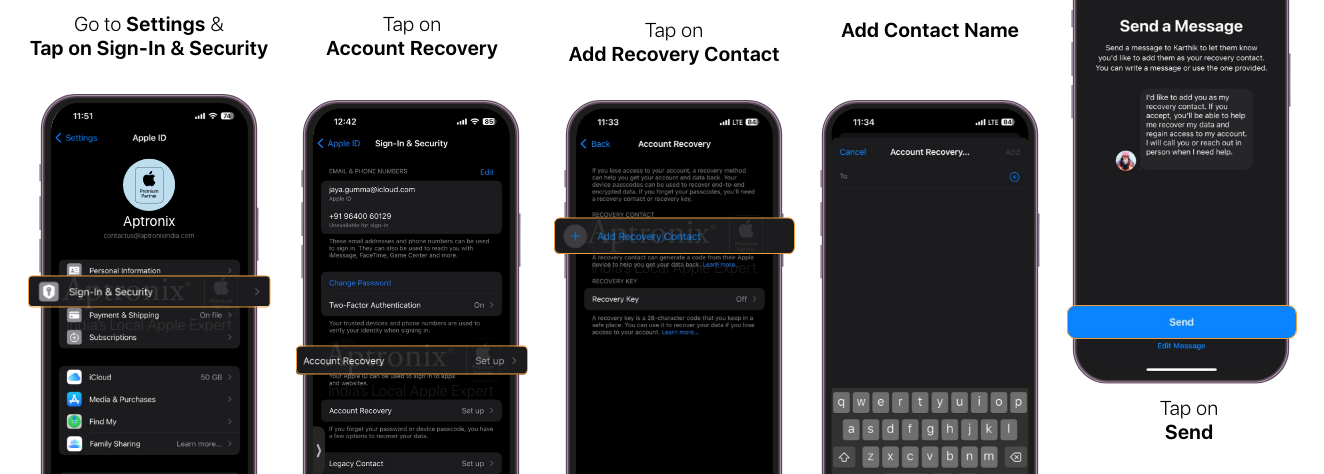
- Account recovery: Lost your Apple ID and password? Don't worry, we've got you covered! all you need to do is go to settings > tap on Apple ID > Select sign in & security > And select Account recovery. When you tap on account recovery you have two options to recover your account,
- Account recovery contact : Regaining access to your account and getting your old data is now just a breeze! All you have to do is send a recovery request to someone you can trust in your contacts with an iPhone with iOS 15, iPadOS 15, macOS 15 or later for the ability to give you a code to recover your apple ID and passcode.
An account recovery contact can help you make sure you always have access to your account, even if you forget your Apple ID, password or device passcode. You can add up to 5 contacts to your account recovery.
Go to settings > tap on Apple iD > Select sign in & security > And select Account recovery > Tap add recovery contact > select the contact and send the request for account recovery.
When the contact accepts your request you can now recover your account.
Note: you also need to turn on two-factor authentication which allows the contact to receive code during recovery.
- Recovery Key: Don’t wanna depend on others to regain access to your account?don't worry, you have options for your choices! Dive into settings and tap on Apple ID > select signin & security > click on Account recovery > select Recovery Key and enable it. You will now get a recovery key text copy that in your notes or pen it down and verify and confirm the recovery key. Voila you can now recover your Apple id with a Recovery Key without waiting for your recovery contact to share the passcode.
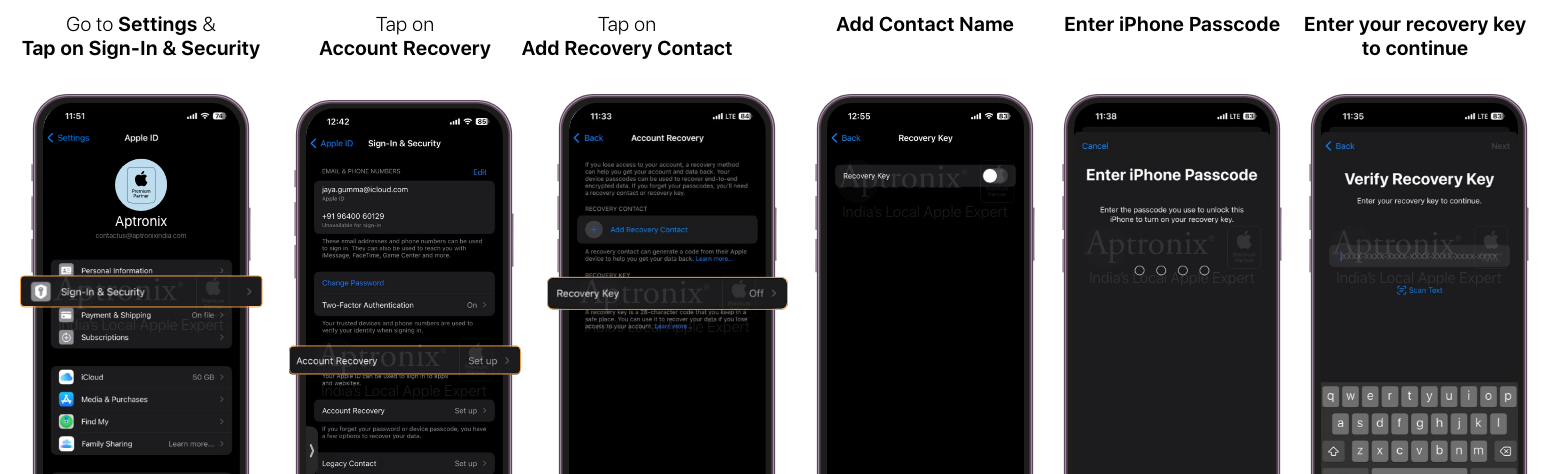
You can actually recover your Apple account and data back when you forget your passcode and are unable to recover your account. You can use a recovery contact added to your list or enable recovery key and follow the on screen instructions.
- Password management: You can utilize the integrated password manager to create and securely store strong, unique passwords for your various accounts.
- Privacy settings: Customize your privacy preferences to manage your apps by giving access to your location, contacts, photos, and other personal data.
- Find My: Activating Find My for your iPhone serves the dual purpose of locating your device if it's lost or stolen and incorporating features like Activation Lock to thwart unauthorized access.
Click on to check more on how you can find your device using Find My app in Apple ecosystem
Software Updates: Stay Up To Date
The most important and necessary thing that can improve the performance of your device, fix bugs, improve security, access new features, and more with frequent Software Updates.
Software updates are the lifeblood of the iPhone, as they serve as essential upgrades that boost performance, fix bugs, enhance security, unlock new features, and more.
Here is how you need to check for any software updates or a few settings that can enable automatic software updates on your iPhone. Follow these steps:
- Open the Settings app on your iPhone.
- Tap on General in your iPhone settings
- Click on "Software Update".
- If you have any new software updates, tap on Download and Install.1234
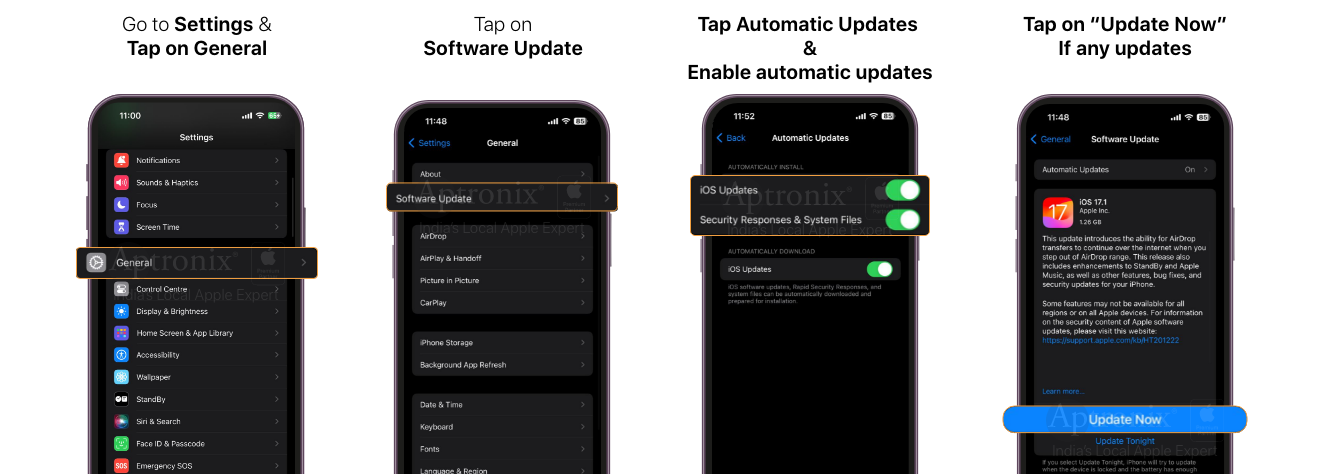
Here is a tip: You can also enable automatic updates. All you need to do is
Go to Settings > General > Software Update and turn on Automatic Updates.
You can automatically download and install updates when they become available, so you don't have to check for updates manually. It's important to keep your iPhone up to date with the latest software updates as they can improve performance, fix bugs, enhance security, and unlock new features.
App Store: A treasure trove of Apps for your Needs
Are you looking for a new app, or making an app purchase, or know the in-app events? All you need to do is sign in to the App Store with your Apple ID and Get the Apps that fulfill your requirements.
Click on to check more about the App Store within the Apple Ecosystem and discover how to effortlessly download apps. You can also know how you can sign in with your existing Apple ID or create a new one to seamlessly access the vast library of apps available in AppStore.
Here is an overview of what you can also explore in your App Store, along with the Apps that fulfill your needs. You can also explore trending apps, games, useful tools, premium gaming experiences, entertainment, or something specific.
- Today: This is where you'll find featured stories, apps, and in-app events. It's like the front page of a magazine, showcasing what's hot and exciting right now.
- Games: If you're into gaming, this is your playground. You can explore different types of games like action, adventure, puzzles, and more. Think of it as a massive game store where you can search and get your favorites.
- Apps: This is the go-to place for everything else besides games. Whether you need tools for work, want to learn something new, or just want to have fun, you'll find it here. It's like a digital shopping mall with stores for all your needs.
- Arcade: If you're really into gaming and want premium experiences without annoying ads or extra purchases, Apple Arcade is your VIP club. It's a subscription service with the best games curated just for you.
- Play: Think of this as the fun and leisure section. It's where you find social media, music, and video apps. Perfect for unwinding and enjoying your free time.
- Search: When you know what you want, use the search bar. It's like asking a store clerk to find a specific item for you. Just type in the name of the game or app you're looking for, and it'll appear.
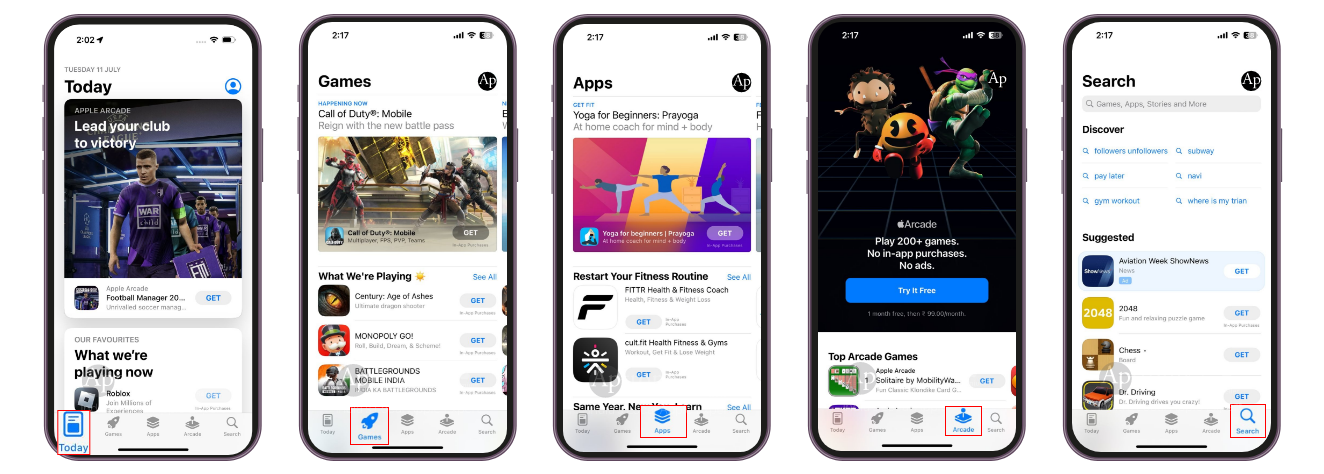
So, whether you're looking for the latest trends, games, useful tools, premium gaming experiences, entertainment, or something specific, the App Store has you covered!
Camera Settings: Get Set Go
Holding a brand new iPhone in your hand, you can't wait to capture amazing photos and videos to share with your loved ones or simply to keep for yourself. But with so many settings to choose from, it can be overwhelming to know where to start.
Don't worry, we got you covered! Here are a few must-have iPhone camera settings that you can use to take amazing photos and videos, even if you're not a professional photographer.
For starters you can check choose the camera modes and how
Choose a camera mode: The Camera app has several modes, including Photo, Video, Portrait, Night, and more. Choose the best mode that suits your needs for the moment you want to capture.
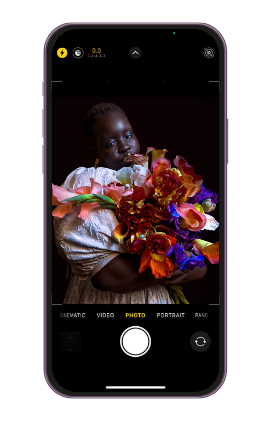
Photo Mode
The Photo mode is the default and most commonly used mode on the iPhone camera, allowing you to capture both stills and Live Photos. This mode allows automatic focus and exposure adjustments, which adapt to the subject you're pointing the camera at.
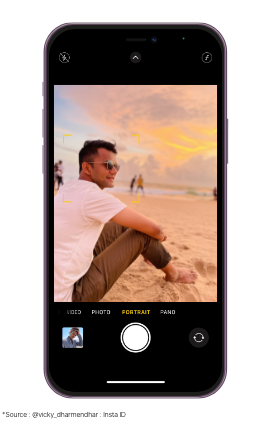
Portrait mode:
With portrait mode your photos look incredible by creating a depth-of-field effect. When you use this mode, your iPhone camera will analyze the scene to identify the subject. It will then create a blurred background effect that highlights the subject's details.
Capturing stunning Portrait mode photos with your iPhone camera is easy and fun! To get started, simply open the Camera app and swipe to Portrait mode. Follow the on-screen tips to ensure your camera is ready, and then tap the Shutter button to take your photo.
With Portrait mode, you can take advantage of various lighting effects to add depth and drama to your photos. You can even preview these effects in real-time and choose the one that best suits your subject.
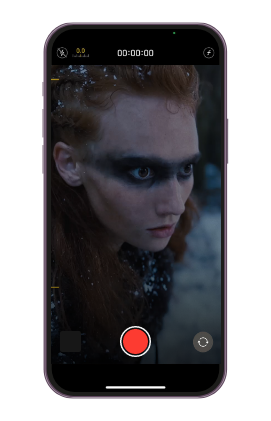
Cinematic ModeCinematic Mode is a setting that creates a shallow depth of field effect in your videos, making the subject stand out from the background. This is a great way to create professional-looking videos without any special equipment.
The Cinematic mode in your iPhone camera works best if you have the latest version of iOS installed. Also, not all iPhone models support Cinematic mode, so you need to have one of these models:
iPhone 14 Pro Max, iPhone 14 Pro, iPhone 14, iPhone 14 Plus ,iPhone 13 Pro Max, iPhone 13 Pro, iPhone 13, and iPhone 13 mini
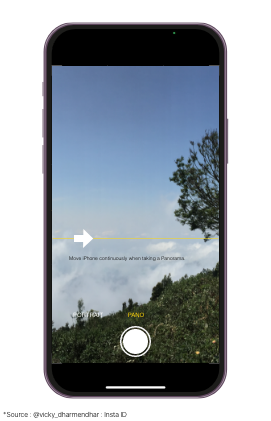
Pano Mode
In Pano mode a series of photos are actually stitched together to form one long photo. But if you move around too much when panning your final result might not be perfect.
- Select Pano mode.
- Press the shutter button.
- Slowly pan in the arrow's direction while maintaining the center line.
- Tap the Shutter button one more time to complete.
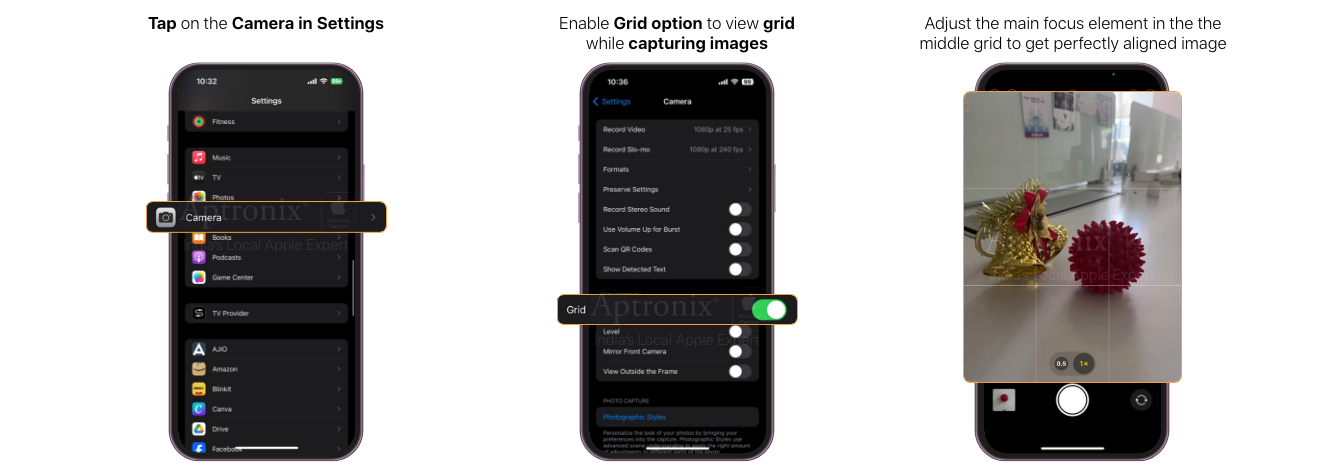
Grid
The grid setting overlays a grid of nine squares on your camera viewfinder. This can help you to compose your photos more effectively by following the rule of thirds.
Turn on the grid to help you compose your shots.
Go to settings >Tap Camera > enable “grid”
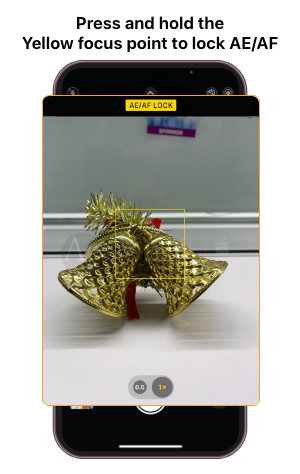
AE/AF Lock
AE/AF Lock stands for auto exposure/autofocus lock. This setting locks the exposure and focus of your photo, so that it doesn't change even if you move the camera.
To use AE/AF Lock, tap and hold the subject you want to focus on until you see a yellow AE/AF Lock box appear. You can then move the camera around to compose your photo without worrying about the exposure or focus changing.
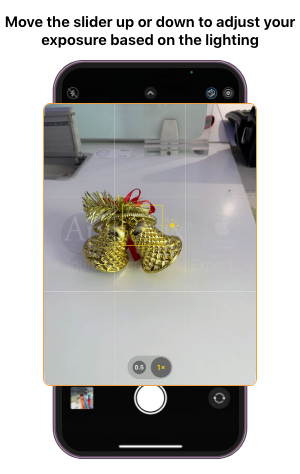
Set focus and exposure: To set focus and exposure, click on the screen where you want to focus. You can find a yellow box that appears to indicate the focus point where you can also adjust the exposure with a slider that can be swiped up or down on the screen.
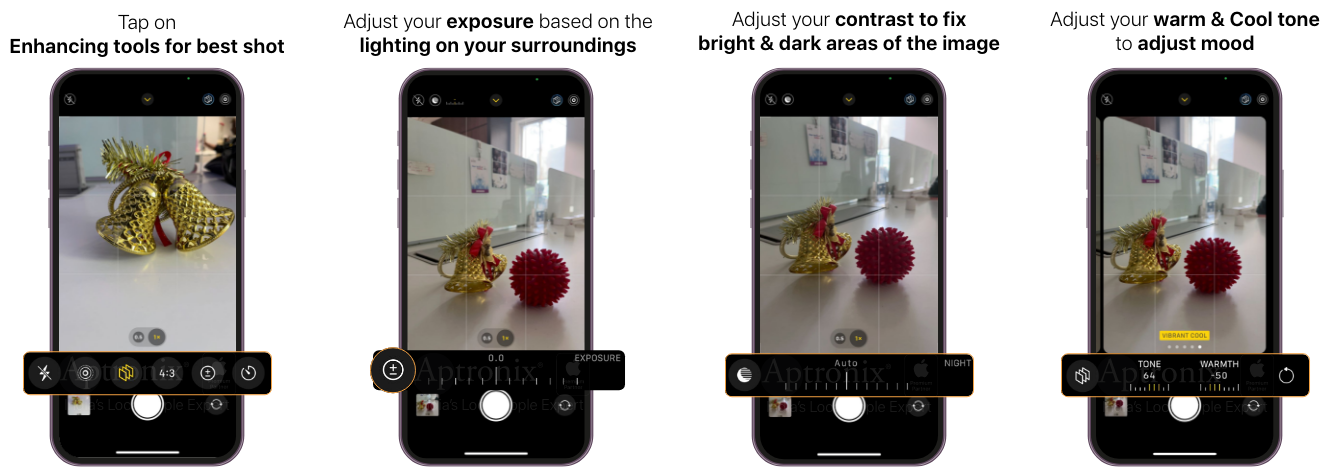
Want to make others feel “Wow” when they see your iPhone shots? Check these settings when you open your camera and tap on the up arrow mark and you can find
- Use the flash: The flash can help you take better photos in low light conditions. Click on the lightning bolt icon to turn on the flash.
- Use the self-timer: The self-timer can help you take photos without having to hold the phone. Tap the clock icon and choose the time delay.
- Edit your photos: There are several editing tools available in the Photos app for enhancing your photos. Crop, adjust brightness and contrast, apply filters, and more.
- Level your Shots : With the iOS17 update in, your iPhone 12 or later models can now perfect shots with the level-up feature. All you need to do is go to settings> Camera> Enable “level”.
- Live Photos
Live Photos is a setting that captures 1.5 seconds of video before and after you take a photo. This can be a great way to capture moments that are too fleeting to capture with a still photo.
Home Screen: A Tidy Home for Easy Access
The Home Screen is where you spend most of your time, so it's important to know how to move apps and widgets around and create a layout that works for you.
Why do you need to organize your home screen?
Organizing your home screen allows you to create a focused home screen page with the apps and widgets you want in one place. Moreover, a clean and organized Home Screen can make your iPhone look much neater and easy to navigate. You can also save time searching for the app you need.
Here are some of the most important home screen settings that every new big iPhone user should know:
- Move apps and widgets: You can move apps and widgets around on your home screen by long-pressing on them until they start to wiggle, then dragging them to a new location.
- Reset home screen layout: If you want to start fresh with your home screen layout, you can reset it by going to Settings > General > Transfer or Reset iPhone > Reset > Reset Home Screen Layout.
- Customize home screen: You can customize your home screen by changing your wallpaper, rearranging your app icons, adding widgets, and changing the icons.
- Use focus modes: Focus modes allow you to organize customized home screens, lock screens, and more. You can create different focus modes for different activities, such as work or leisure.
- Dark mode: Dark mode reduces eye strain and saves battery life by going to Settings > Display & Brightness and selecting Dark.
Control Centre: Command & Control your iPhone
Control Center on iPhone is a powerful tool that gives you instant access to the things you do the most. Whether you want to quickly change the brightness of your display, take a picture, turn on Wi-Fi, or control your Apple TV, Control Center makes it easy to do it all with just a few taps.
Here are some beginner settings for Control Center on iPhone:
- Accessing Control Center: You can access Control Center by swiping down from the top right corner of your screen on iPhones with Face ID or by swiping up from the bottom of your screen on iPhones with a home button.
- Customizing Control Center: You can customize the Control Center by going to Settings > Control Center. From there, you can add or remove controls, rearrange controls, and even add third-party app controls.
- Using Control Center: The Control Center provides quick access to a variety of settings and features, such as Wi-Fi, Bluetooth, Airplane mode, Do Not Disturb, and more. You can tap on a control to turn it on or off or press and hold a control to access it.
Mastering your iPhone and making the most of its features can greatly enhance your user experience. As a newbie to the iPhone ecosystem, it's essential to explore and configure these settings to simplify your journey.
Want to know how to take Screenshots on Your Apple iPhone or iPad?
Stay tuned to know more!
For more such content, follow us on our Instagram handle @aptronixindia